The only thing physically left to do with this tank is to bring it to life with ambient sounds of nature! This was a very important aspect for me. I feel like it truly puts the icing on the cake when you can put your ear to the tank and hear the sounds of the rain forest.
What Does The Rain Forest Sound Like?
I find ambient nature sounds extremely soothing to work to. Having a jungle waterfall yards away from my usual workspace beats studying at any coffee shop. The idea of what sounds should come from my paludarium were simple:
- Morning would be a subtle ambiance of animals and insects making noise in the distance
- Noon would slowly draw in louder bugs and a pouring waterfall in the background
- The evening would be a mixture of animals interacting far away with slight chirping from crickets
- The night would bring a stronger variety of crickets chirping along with maybe sound distant howling off & on
- Storm would slowly welcome in rolling thunder with a burst of lightning here and there


Nature Sounds & Thunder Storms In A Paludarium
A combination of a DF Player, a speaker & an Arduino and anythings possible. not only was I able to get the exact sounds to work, but the lightning also seems so much more impressive when you pair the lights with sound.
Materials:
- Mega2560 Ultimate Starter Kit – I would highly recommend getting this kit. If you are considering going with a clone Mega2560 board, this kit will come with most of the parts used to build this paludarium. I will put (**) next to the items this kit includes so you know what you will still need to consider getting if you choose to order this kit. I will put (*) to indicate the kit comes with an alternative item that isn’t that part but could be substituted to work. https://amzn.to/2LqQ43e
- Arduino Mega2560 board* – This is the micro-controller board I decided to go with. A clone should work as well but shop at your own risk. https://amzn.to/2Lm0hha
- Power Supply Module** – It’s best to power everything separate from the board. Just make sure it is all connected through the ground wire on the breadboard. https://amzn.to/2uOEp3X
- Power Adapter – You will need two of these, one for the board and one for the breadboard if your Arduino doesn’t come with one already. https://amzn.to/2LrVdYY
- Breadboard Kit** – If you decide not to go with the starter kit, I’d recommend getting at least this kit. It comes with a breadboard, jumper wires, and resistors… Plus a couple of other little odds and ends that will come in handy later. https://amzn.to/2OgwFjf
- Solder-able Breadboard – Once you are ready to install the electronics into the tank, It would be highly recommended you solder everything down into one of these boards… I learned this the hard way and had to do it later when I started having faulty wire issues with the LEDs. https://amzn.to/2LP6myQ
- Dfplayer Mini – This tiny tool will be responsible for playing the audio we save on a memory card. https://amzn.to/2LPau22
- Amplifier Module – These aren’t needed but does add a nice touch when paired with a mini sub-woofer instead of a speaker. https://amzn.to/2JVvPEZ
- Speaker – Any small speaker will pretty much work for this. https://amzn.to/2NKXFGx
- 16g Speaker Wires – You will need enough of this to run lines to and from the speaker. https://amzn.to/2JWCL4L
- Mini SD card – You won’t need a lot of space for this. So any size will work. https://amzn.to/2JWGbVh
Tools:
- Arduino IDE Software – This is the software you will use to write and send the code to the Arduino board. You can download it for free here
- Soldering Iron Kit – This is going to be extremely handy when it’s time to lock down the wires and keep them from moving later. https://amzn.to/2Lr3bS9
Constructing The Sound FX:
- I started by placing my speaker at the very top of the paludarium with the lights. It’s safe and with the sound pointing into the tank, its a perfect place to project the audio waves.
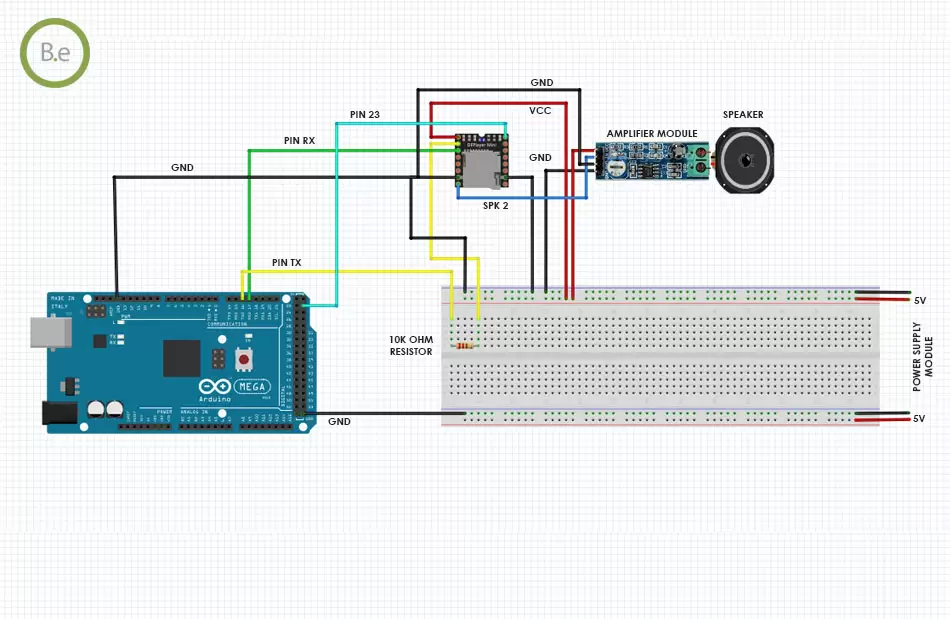
- I crimped and ran the wires down to the amplifier module where I would connect everything together with the Arduino board. Here is a diagram for the wiring schematic:


- If you haven’t already, download the files you want to have played and place them in a folder labeled “MP3” on the SD card and plug it into the Dfplayer.
- We can now update the code. Start by adding the Dfplayer Library to the top of the code:
#include <DFRobotDFPlayerMini.h>
- Next, we need to define the Dfplayer and its variables with this code:
DFRobotDFPlayerMini myDFPlayer;
int buusyPin = 23;// buusyPin = 23; // sound player busy
int bsy = 0;
int sensorPin = A3;    // Audio level samples
int sensorValue = 0;
boolean isPlaying = false;
- Now we need to assign the Dfplayers pin as well as initiate the code for the player to run at the start. Place this code in the “setup” void:
pinMode(buusyPin, INPUT);
 Serial2.begin(9600);
  if (!myDFPlayer.begin(Serial2)) {  //Use softwareSerial to communicate with mp3.
    //Serial.println(F("Unable to begin:"));
    //Serial.println(F("1.Please recheck the connection!"));
   // Serial.println(F("2.Please insert the SD card!"));
  }
  else{
  //Serial.println(F("DFPlayer Mini online."));
  }
  myDFPlayer.setTimeOut(500); //Set serial communictaion time out 500ms
  //myDFPlayer.reset();
  myDFPlayer.volume (20);          // must remove mp3_reset(); to get this to work
  myDFPlayer.volumeUp(); //Volume Up
  myDFPlayer.volumeDown(); //Volume Down
- In the “loop” void we will add this line of code so that the player plays whenever expected to:
 if (myDFPlayer.available()) {
    printDetail(myDFPlayer.readType(), myDFPlayer.read()); //Print the detail message from DFPlayer to handle different errors and states.
  }
- In the “clear sky” void we need to update the code so that our nature sounds play whenever we cycle through the day/night settings. Add this code to that void:
//--------------------------------
//    SOUND
//--------------------------------
//Sky Off
  if(digitalRead(buusyPin) !=1 && subpage2_counter ==0 && subpage_counter ==0){
    if(SkyState !=0){
      SkyState = 0;
    }
  }
//Morning
   //Serial.println(digitalRead(buusyPin));
  if(digitalRead(buusyPin) !=0 && subpage2_counter ==1 && subpage_counter ==0){
    if(SkyState !=1){
      SkyState = 1;
    }
    myDFPlayer.volume (15);
    myDFPlayer.play(10);
    buusyPin ==0;
  }
//Noon
  // Serial.println(digitalRead(buusyPin));
  if(digitalRead(buusyPin) !=0 && subpage2_counter ==2 && subpage_counter ==0){
     if(SkyState !=2){
      SkyState = 2;
    }
    myDFPlayer.volume (15);
    myDFPlayer.play(11);
    buusyPin ==0;
  }
  //Evening
   //Serial.println(digitalRead(buusyPin));
  if(digitalRead(buusyPin) !=0 && subpage2_counter ==3 && subpage_counter ==0){
     if(SkyState !=3){
      SkyState = 3;
    }
    myDFPlayer.volume (17);
    myDFPlayer.play(12);
    buusyPin ==0;
  }
//Night
  // Serial.println(digitalRead(buusyPin));
  if(digitalRead(buusyPin) !=0 && subpage2_counter ==4 && subpage_counter ==0){
     if(SkyState !=4){
      SkyState = 4;
    }
    myDFPlayer.volume (18);
    myDFPlayer.play(13);
    buusyPin ==0;
  }
- now let’s add some code to the “cloudy sky” void so that we will have the thunder sound effects when the storm setting is selected:
 if(digitalRead(buusyPin) !=0 && subpage_counter ==0){
    myDFPlayer.volume (25);
    myDFPlayer.play(14);
    //isPlaying = true;

      //Serial.println(digitalRead(buusyPin));
     //while (bsy == 0); // zero when sound active
  }
   sensorValue = analogRead(sensorPin);
      //Serial.println(sensorValue);
      //Serial.println(" ");
      if (sensorValue >= 650) {
        StormLEDPos=255;
        analogWrite(StormLED,StormLEDPos);
      }
      if (sensorValue <= 550) {
        StormLEDPos=0;
        analogWrite(StormLED,StormLEDPos);
      }
      bsy = digitalRead(buusyPin);
- The last code to add is a “debug” void for the DF player to help with issues if something doesn’t work on the player end. Add this line of code at the end:
if(digitalRead(buusyPin) !=0 && subpage_counter ==0){ myDFPlayer.volume (25); myDFPlayer.play(14); //isPlaying = true; //Serial.println(digitalRead(buusyPin)); //while (bsy == 0); // zero when sound active } sensorValue = analogRead(sensorPin); //Serial.println(sensorValue); //Serial.println(" "); if (sensorValue >= 650) { StormLEDPos=255; analogWrite(StormLED,StormLEDPos); } if (sensorValue <= 550) { StormLEDPos=0; analogWrite(StormLED,StormLEDPos); } bsy = digitalRead(buusyPin); - We can now verify that the code works and upload it to the Arduino Board. If all is well you should have working sound when the sky setting is initiated.


Conclusion
This is probably the most appreciated part of this tank when people view it. The level of professionalism it adds is surreal. If you made it this far in the series, hats off to you… The tank is just about done.


